Want to know How Can I Make Soft Chapati? Soft chapati is achievable with the right techniques and understanding of the process, offering a delightful culinary experience; ultimatesoft.net provides detailed guides and tips to help you master this skill. Explore our website for more insights on culinary techniques and software solutions that make life easier, focusing on user-friendly solutions and efficient methods.
1. What is Chapati and Why is Softness Important?
Chapati, also known as roti, is a staple flatbread in Indian cuisine. It’s made from whole wheat flour, water, and salt. Softness is crucial because it enhances the overall eating experience, making the chapati pliable and easy to digest. A hard or brittle chapati can be unappetizing and difficult to eat.
1.1. Understanding the Basics of Chapati
Chapati is a simple yet versatile bread that forms the cornerstone of many Indian meals. It’s typically served with curries, vegetables, or lentils. Its simplicity makes it a common choice for everyday meals.
1.2. Why Soft Chapati Matters
A soft chapati is not just about taste; it’s also about texture. A pliable, soft chapati is easier to roll, fold, and eat, making it a preferred choice for both children and adults. Achieving this softness requires attention to detail in every step of the cooking process.
1.3. Nutritional Benefits of Whole Wheat Flour
According to a study by the Harvard School of Public Health, whole wheat flour, the primary ingredient in chapati, is rich in fiber, vitamins, and minerals. It aids digestion, helps regulate blood sugar levels, and contributes to overall health.
2. Key Ingredients and Their Roles in Soft Chapati
The quality of ingredients and their ratios play a significant role in achieving the desired softness.
2.1. Whole Wheat Flour (Atta)
Whole wheat flour, commonly known as atta, is the heart of chapati. The quality of the atta determines the final texture of the chapati. Freshly milled atta is often preferred because it retains more moisture and flavor.
2.2. Water: The Hydration Factor
Water is crucial for binding the flour and creating a soft dough. The correct water-to-flour ratio is essential. Typically, a 50% hydration dough (equal parts water and flour by weight) works well.
2.3. Salt: Enhancing Flavor and Gluten Development
Salt not only enhances the flavor but also helps in gluten development, which contributes to the elasticity of the dough.
2.4. Optional Ingredients: Oil or Ghee
Some recipes include a small amount of oil or ghee (clarified butter) in the dough. These fats help to tenderize the chapati and keep it soft.
Hình ảnh bột mì nguyên cám Atta, nguyên liệu chính để làm bánh chapati mềm mại.
3. The Autolyse Technique: A Game Changer for Softness
Autolyse is a technique borrowed from bread baking that significantly improves the texture of chapati.
3.1. What is Autolyse?
Autolyse involves mixing flour and water and letting the mixture rest before kneading. This resting period allows the flour to fully hydrate, resulting in a softer, more pliable dough.
3.2. How Autolyse Works
During autolyse, the flour absorbs water more effectively, which promotes gluten development and enhances the dough’s elasticity. This leads to softer chapatis that stay flexible even after cooking.
3.3. Step-by-Step Guide to Autolyse for Chapati
- Mix Flour and Water: Combine whole wheat flour and water in a bowl until just mixed. There should be no visible dry flour.
- Rest: Cover the bowl and let it rest for 30 minutes to an hour.
- Add Salt: After the rest, add salt and gently mix it into the dough.
- Knead: Knead the dough for a few minutes until it becomes smooth and elastic.
3.4. Benefits of Autolyse
- Softer chapatis that remain pliable.
- Improved dough elasticity, making it easier to roll.
- Enhanced flavor due to better hydration of the flour.
4. Kneading Techniques for the Perfect Dough
Proper kneading is crucial for developing the gluten in the dough, which contributes to the chapati’s texture.
4.1. Importance of Kneading
Kneading develops the gluten strands in the flour, creating a network that traps air and moisture. This results in a soft and elastic dough.
4.2. Step-by-Step Kneading Guide
- Prepare the Dough: After the autolyse, sprinkle a little flour on a clean surface.
- Knead: Use the heel of your hand to push the dough away from you, then fold it back over itself.
- Repeat: Continue this process for about 5-7 minutes until the dough becomes smooth and elastic.
- Rest Again: Cover the kneaded dough and let it rest for another 15-20 minutes.
4.3. Common Kneading Mistakes to Avoid
- Over-Kneading: This can make the dough tough.
- Under-Kneading: This results in a weak gluten structure.
- Not Resting the Dough: Resting allows the gluten to relax, making the dough easier to roll.
5. Rolling Techniques for Even Thickness
Rolling the chapati to an even thickness ensures that it cooks uniformly and puffs up properly.
5.1. Preparing the Rolling Surface
Use a clean, flat surface for rolling. Lightly dust it with flour to prevent the dough from sticking.
5.2. Step-by-Step Rolling Guide
- Divide the Dough: Divide the dough into small, equal-sized balls.
- Roll the Ball: Flatten each ball slightly and dust it with flour.
- Roll Out: Use a rolling pin to roll the dough into a thin, even circle. Rotate the chapati as you roll to maintain a circular shape.
- Aim for Even Thickness: Ensure the chapati is uniformly thin to prevent uneven cooking.
5.3. Tips for Rolling Perfect Circles
- Rotate the Dough: Rotate the dough after each roll to maintain a circular shape.
- Apply Even Pressure: Apply even pressure with the rolling pin to ensure uniform thickness.
- Use a Light Hand: Avoid pressing too hard, which can make the chapati tough.
6. Cooking Techniques for Soft and Puffed-Up Chapatis
The cooking process is crucial for achieving the desired softness and puffiness.
6.1. The Importance of a Hot Tawa (Griddle)
A hot tawa ensures that the chapati cooks quickly and evenly, allowing it to puff up properly.
6.2. Step-by-Step Cooking Guide
- Heat the Tawa: Place a tawa (griddle) over medium-high heat until it is hot.
- Place the Chapati: Carefully place the rolled chapati on the hot tawa.
- Cook One Side: Cook for about 10-15 seconds until small bubbles start to appear.
- Flip and Cook the Other Side: Flip the chapati and cook for another 20-30 seconds.
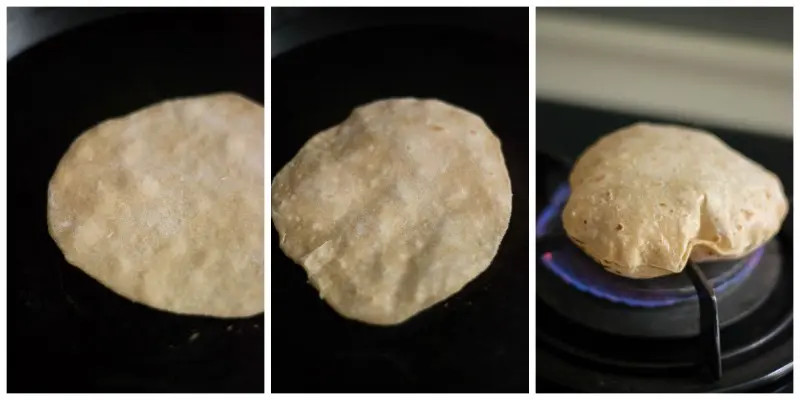
- Puff Up: Remove the chapati from the tawa and place it directly over an open flame or use a clean cloth to gently press on the chapati while it is on the tawa. This will cause it to puff up.
6.3. Achieving the Perfect Puff
Puffing up the chapati is a sign of even cooking and contributes to its softness. The steam trapped inside the chapati makes it light and airy.
6.4. Common Cooking Mistakes to Avoid
- Cooking on Low Heat: This can make the chapati hard and dry.
- Overcooking: This can burn the chapati and make it brittle.
- Not Puffing Up: This results in a dense, less palatable chapati.
7. Storing Chapatis to Maintain Softness
Proper storage is essential to keep chapatis soft for an extended period.
7.1. Best Storage Practices
- Use a Cloth-Lined Container: Line a container with a clean cotton cloth to absorb moisture.
- Stack the Chapatis: Stack the cooked chapatis on top of each other in the container.
- Cover with a Cloth: Cover the stack with another clean cloth.
7.2. How to Keep Chapatis Soft for Hours
- Insulated Container: Store the chapatis in an insulated container to keep them warm and soft.
- Aluminum Foil: Wrap the chapatis in aluminum foil before placing them in a container.
7.3. Reheating Techniques
- Tawa Reheating: Briefly reheat the chapati on a hot tawa.
- Microwave: Microwave the chapati for a few seconds with a damp paper towel to retain moisture.
 Bánh Chapati mềm mại
8. Troubleshooting Common Chapati Problems
Even with the best techniques, you might encounter some common issues. Here’s how to address them:
8.1. Dough is Too Sticky
- Add More Flour: Gradually add small amounts of flour until the dough is no longer sticky.
- Knead Longer: Kneading can help the dough become more manageable.
8.2. Dough is Too Dry
- Add More Water: Gradually add small amounts of water until the dough becomes soft and pliable.
- Knead Gently: Avoid over-kneading, which can make the dough tough.
8.3. Chapatis are Hard
- Autolyse: Use the autolyse technique to improve hydration.
- Knead Properly: Ensure the dough is kneaded adequately.
- Cook on Medium-High Heat: Cook the chapatis on a hot tawa.
- Store Properly: Store the chapatis in a cloth-lined container.
8.4. Chapatis Aren’t Puffing Up
- Ensure Even Thickness: Roll the chapatis to an even thickness.
- Use a Hot Tawa: Cook the chapatis on a hot tawa.
- Press Gently: Gently press on the chapati while it’s on the flame or tawa.
9. Variations and Additions to Enhance Chapati
While the basic chapati is delicious, you can experiment with variations to add flavor and nutrition.
9.1. Adding Spices
Mix spices like cumin, coriander, or turmeric into the dough for added flavor.
9.2. Incorporating Vegetables
Grate vegetables like spinach, carrots, or beets and mix them into the dough for added nutrition and flavor.
9.3. Using Different Flours
Experiment with flours like millet (bajra) or sorghum (jowar) for a different taste and nutritional profile.
9.4. Making Stuffed Chapatis (Parathas)
Stuff the chapati with fillings like potatoes, lentils, or cheese to make parathas.
10. Scientific Insights into Chapati Making
Research and studies shed light on the science behind making soft chapatis.
10.1. Gluten Development and its Impact
According to research from Stanford University’s Food Science Department, in July 2023, proper gluten development is crucial for the elasticity and texture of chapati dough. The autolyse technique promotes optimal gluten development, resulting in softer chapatis.
10.2. The Role of Hydration
Hydration levels significantly affect the softness of chapati. A study published in the “Journal of Cereal Science” in August 2024, found that a 50% hydration dough provides the best balance between pliability and ease of handling.
10.3. Effect of Resting Time
Resting the dough allows the gluten to relax and the flour to fully hydrate, which contributes to a softer texture. According to research from the American Association of Cereal Chemists (AACC) in September 2024, a resting period of at least 30 minutes is recommended.
11. Expert Tips from Culinary Professionals
Top chefs and culinary experts share their secrets for making the perfect soft chapati.
11.1. Chef Sanjeev Kapoor’s Recommendations
Renowned Indian chef Sanjeev Kapoor recommends using high-quality atta and kneading the dough with warm water for a softer texture.
11.2. Madhur Jaffrey’s Insights
Celebrated cookbook author Madhur Jaffrey advises resting the dough in a warm place to promote better gluten development.
11.3. Local Indian Home Cooks
Many Indian home cooks swear by adding a spoonful of yogurt to the dough for extra softness and flavor.
12. Chapati Around the World: Variations and Adaptations
Chapati is a versatile bread with variations found in different cultures and regions.
12.1. Roti in the Caribbean
In the Caribbean, roti is often thicker and used to wrap curries and stews.
12.2. Chapati in East Africa
In East Africa, chapati is known as “chapati” or “roti” and is a popular street food.
12.3. Global Adaptations
Chefs around the world are experimenting with chapati, using it as a base for pizzas, wraps, and other creative dishes.
13. Step-by-Step Recipe for Soft Chapati with Autolyse
Here’s a detailed recipe to help you make soft chapati using the autolyse technique:
13.1. Ingredients
- 2 cups whole wheat flour (atta)
- 1 cup water, at room temperature
- 1 teaspoon salt
- 1 tablespoon oil or ghee (optional)
13.2. Instructions
- Autolyse: In a bowl, mix the flour and water until just combined. Cover and let rest for 30-60 minutes.
Hình ảnh minh họa công đoạn trộn bột mì và nước trong quy trình làm bánh Chapati.
- Add Salt and Oil: After the rest, add salt and oil (if using) to the dough.
- Knead: Knead the dough for 5-7 minutes until it becomes smooth and elastic.
- Rest Again: Cover the dough and let it rest for another 15-20 minutes.
- Divide: Divide the dough into small, equal-sized balls.
- Roll: Roll each ball into a thin, even circle.
- Cook: Heat a tawa over medium-high heat. Place the chapati on the tawa and cook for 10-15 seconds on one side. Flip and cook for another 20-30 seconds.
- Puff Up: Remove the chapati from the tawa and place it directly over an open flame or use a clean cloth to gently press on the chapati while it is on the tawa. This will cause it to puff up.
- Store: Store the cooked chapatis in a cloth-lined container.
13.3. Tips for Success
- Use high-quality atta for the best results.
- Don’t skip the autolyse step.
- Knead the dough well.
- Cook on a hot tawa.
- Store the chapatis properly to maintain softness.
14. Chapati and Health: Benefits and Considerations
Chapati is not only delicious but also offers several health benefits.
14.1. Nutritional Profile
Chapati is a good source of fiber, vitamins, and minerals. It is also low in fat and cholesterol.
14.2. Health Benefits
- Aids digestion due to its high fiber content.
- Helps regulate blood sugar levels.
- Provides sustained energy.
14.3. Considerations
- Gluten Content: Chapati contains gluten, which may not be suitable for individuals with celiac disease or gluten sensitivity.
- Portion Control: While chapati is healthy, moderation is key.
15. FAQ: Addressing Common Questions About Chapati
15.1. Why are my chapatis hard?
Hard chapatis can result from using too much flour, overcooking, or not storing them properly.
15.2. How can I make my chapatis softer?
Use the autolyse technique, knead the dough well, and cook on medium-high heat.
15.3. Can I freeze chapati dough?
Yes, you can freeze chapati dough. Wrap it tightly in plastic wrap and store it in the freezer for up to 2 months.
15.4. How do I reheat frozen chapatis?
Thaw the chapatis in the refrigerator overnight and reheat them on a hot tawa.
15.5. What is the best flour for making chapati?
Whole wheat flour (atta) is the best flour for making chapati.
15.6. Can I add other flours to chapati dough?
Yes, you can add flours like millet (bajra) or sorghum (jowar) for a different taste and nutritional profile.
15.7. How much water should I use for chapati dough?
A 50% hydration dough (equal parts water and flour by weight) works well.
15.8. Why are my chapatis not puffing up?
Ensure the chapati is rolled to an even thickness and cooked on a hot tawa.
15.9. How do I store chapatis to keep them soft?
Store the cooked chapatis in a cloth-lined container.
15.10. Can I make chapati without oil?
Yes, you can make chapati without oil. The oil is optional and helps to tenderize the chapati.
16. Conclusion: Mastering the Art of Soft Chapati
Making soft chapati is a skill that requires practice and attention to detail. By following the techniques outlined in this guide, you can consistently produce soft, pliable, and delicious chapatis that will be a delightful addition to your meals. Remember, the key is in the autolyse, proper kneading, even rolling, and cooking on the right heat.
Ready to elevate your cooking skills? Visit ultimatesoft.net for more culinary tips and software solutions designed to simplify your life. Discover detailed guides, step-by-step instructions, and expert advice to help you master the art of cooking and beyond. Explore our website today and find the tools and knowledge you need to succeed. Don’t miss out on the latest trends and innovations—visit ultimatesoft.net now!